|
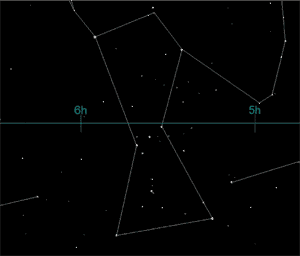
Evaluating lens parameters for the longer focus rectilinear lenses doesn't present too many problems, but fisheyes are a different kettle of fish. Ideally, one would like to take a standard reference target (a chart of some sort), photograph it and then work out the distortion correction parameters from the divergence of the actual camera image from that expected from a perfect lens. In practice, finding a chart with 180 degree coverage and devising an accurate shooting setup is difficult, parallax being an ever present problem to cope with. The method proposed here is to use the night sky as the test target. The angular positions of the stars are known to a high degree of accuracy. One has only to take one or two shots of the stars (on a good night!) and then compare the positions of the stars in the camera image with their expected positions. With the stars effectively at infinity, parallax issues are completely eliminated. How, then, are we to measure the positions of the stars in the camera image? Well, fortunately no measurement is needed. The idea is to take an equirectangular 360x180 image containing a map of the heavens with all the brightest stars present and use this as a reference image. This, together with the camera image(s), is input to one of the Panorama Tools based stitching programs such as PTGui, PTAssembler, and Hugin. Control points are added using the stars as common features. The optimizer is then run to establish the lens parameters that will align the stars in the camera image exactly with those on the star map. We end up with exactly what we are looking for: a perfect set of lens parameters. Perfect lens parameters? Well, maybe not quite perfect in practice, but very good nevertheless. The method clearly depends on having a really accurate map of the stars. It would be best to take a tabulated list of star positions and create the equirectangular image directly by a computer program. As an easier and quicker option, I chose to make use of an astronomical display program (Home Planet) and simply took screenshots of all parts of the sky and stitched them together. This came out at 11000x5500 pixels and seems to be reasonably accurate. I also took the option to mark the constellations, which is a great help in finding your way around. This is a sample view, showing Orion:
You can see the whole reference image in QTVR form at http://www.johnhpanos.com/sky6000.mov
|
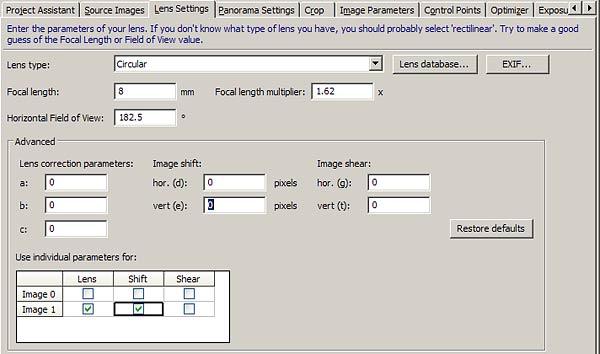
Practicalities The sky is a moving target, so there is a danger of getting star trails instead of sharp points. The exposure therefore needs to be kept short, but also needs to be long enough to record the brighter stars adequately. I used 10 seconds at f/5.6 and ISO 400. This managed to capture an adequate number of stars, though the less bright ones were rather dim. You can experiment. When processing a RAW image, correct chromatic aberration using the same settings as you would normally use for your panorama shots. Using PTGui: 1. Start a new project by adding the camera image in the usual way, in the same orientation that you normally use for panoramas. In the case of a circular fisheye, you need to set a crop circle, but that may prove difficult owing to the black corners merging with the dark sky. It may be best to use crop parameters copied from an existing project. 2. Add the sky reference image ( http://www.johnhpanos.com/skymap.jpg ) via the Add button on the Source Images tab, and select the option to use individual lens parameters on the Lens Parameters tab:
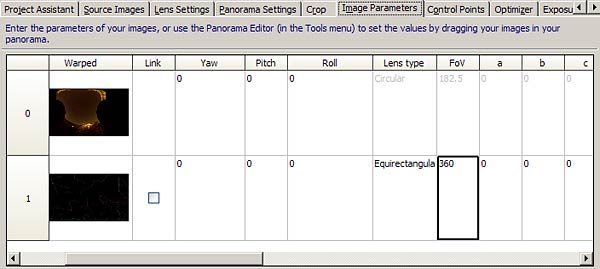
3. The lens type (equirectangular) and fov (360) of the second image is then entered on the Image Parameters tab:
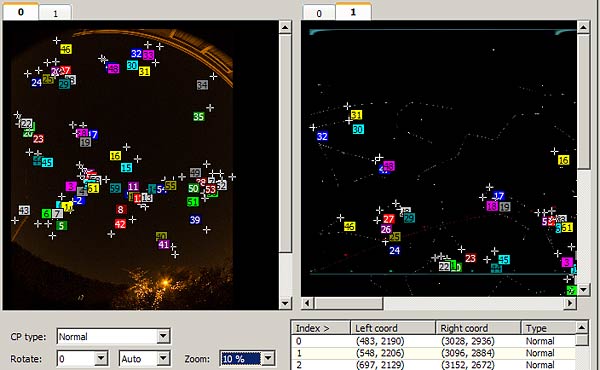
(While the supplied star map will work ok, you should consider preparing a remapped version that better suits your particular location in the world. This is because the top and bottom of the equirectangular image has the usual stretched appearance, making it difficult to identify stars there and assign control points accurately. See the note at the end for instructions on doing this with PTGui). 4. On the Panorama Settings tab, set the output panorama to equirectangular 360x180 5. Go to the crop tab and select "No Crop" for the sky reference image. 6. Go to the Create Panorama tab and click on Set Optimum Size, and select Maximum. 7. Set control points (the fun part). It isn't easy to match up the stars, which look rather anonymous in the camera image. (Remember that you can rotate the control point windows to make comparing them easier). Start with an obvious constellation like Orion above. Once you have set points on the major stars of this constellation, you can hop across to nearby stars with help from the automatic jump feature, which will help find the matching point automatically. It's probably best to click first on a star in the reference map and let PTGui jump to the camera image. 8. From time-to-time, perform optimizations of y,p,r and the lens parameters for the camera image alone. Include the shift parameters d & e along with fov,a,b,c. (See optimization screenshot below). The reports should be very good. If you get a bad result, it will probably be due to placing points on the wrong stars, in which case identify the bad point(s) in the control point table and correct them. 9. Put points onto as many stars as you can, and make sure these are spread as far as possible to the edges of the image. (This needs to be borne in mind when directing the camera to take the photograph, so that some stars are near the corners): You should end up with something like this:
|
The final optimization report looks like this:
So not too bad a result at all. The parameters can now be applied to future projects and should give a good stitch without further optimization, though it's ok to optimize the shift parameters and fov to ensure the best alignment. Note that the lens parameters are affected by any crop used, so the crop parameters need to be applied along with the lens parameters.
NOTE: Remapping the star image Remapping the star image is merely a matter of rotating the image to bring a different part of the sky to the zenith, and thus to the stretched part of the equirectangular image. This doesn't need to be done with any degree of precision. I simply panned up by 90 degrees, and that made things easier in my case, but it's by no means essential to do any remapping. If you should want to do this, here's what to do: Start a new PTGui project by adding the skymap.jpg image. Set the lens type to equirectangular and fov 360. Set the output panorama projection to equirectangular and fov 360x180. Select the panorama size to maximum on the Create Panorama tab (i.e. same size as the input image). Select the numerical transform option (123 button) and apply a suitable pitch adjustment - e.g. +90. Generate the output image without the fast transform
option checked.
|
John
Houghton |
|
 .
.